Falafel – Gluten Free

Had you been wondering if I did any cooking anymore? Well I have to admit, I’ve been a bit slack, I do still cook, I just been sticking to staples and not really bothering to take pictures and remember recipes.  But here we have a simple little falafel recipe, perfect for summer days as part of a mezze or stuffed in a pitta.

falafel

So for the recipe…

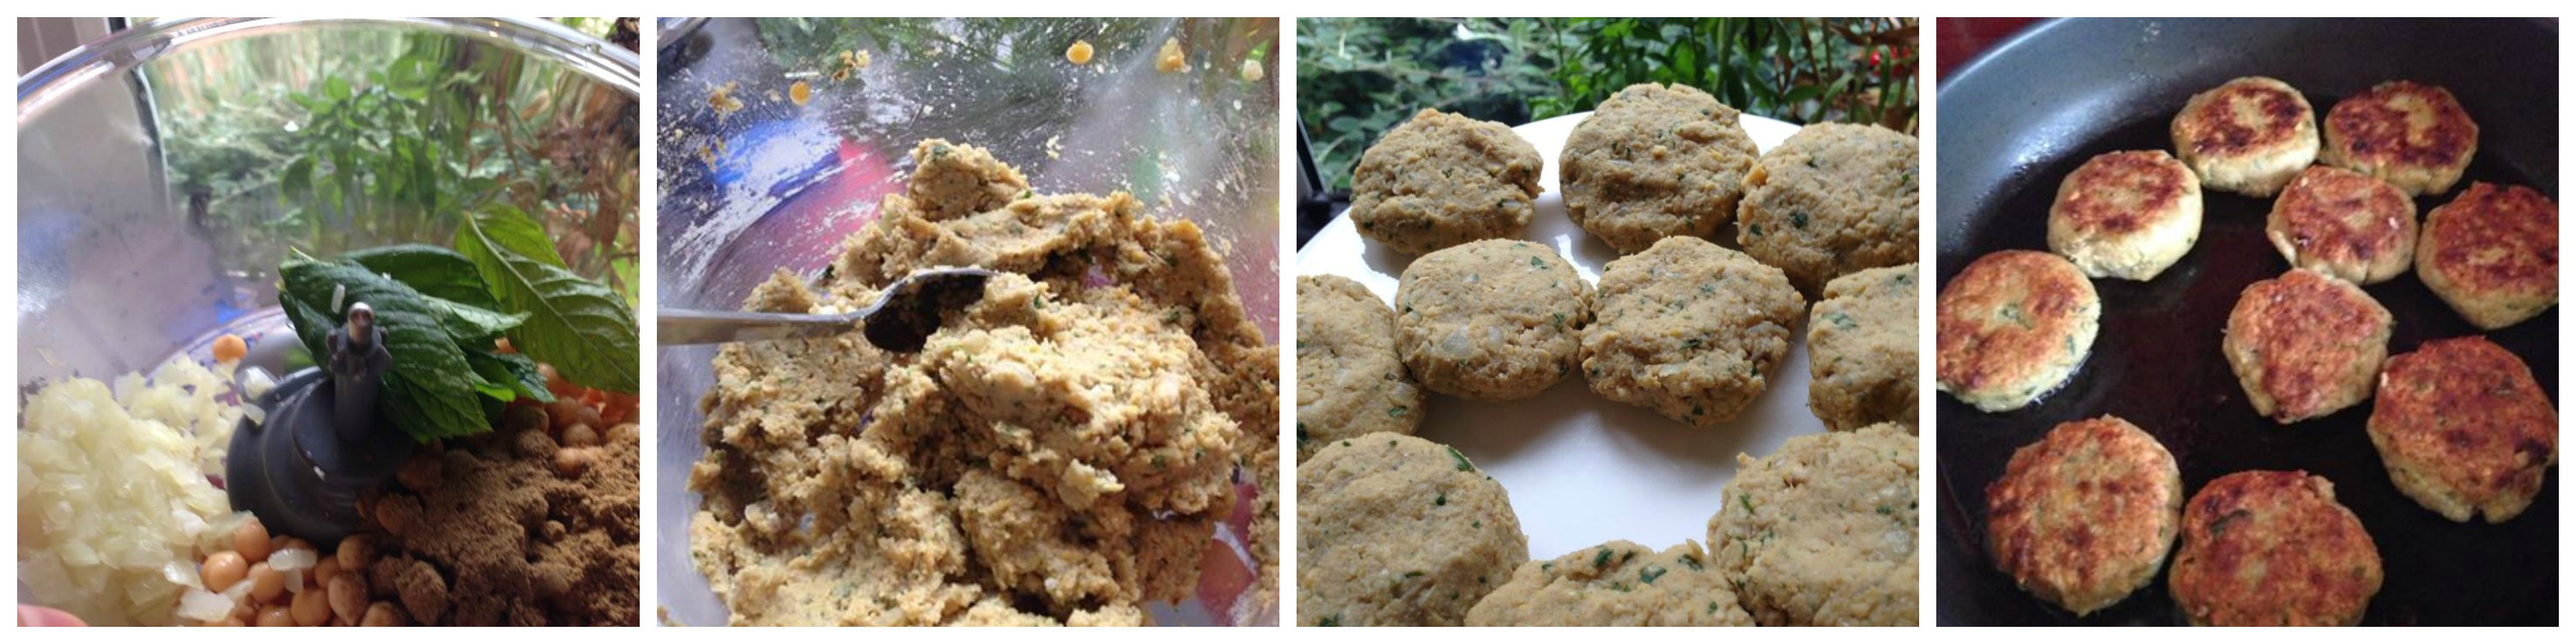
Ingredients (makes 10 small falafel):

  • 1 400g tin of chickpeas
  • 2 cloves of garlic chopped
  • 1 onion, chopped
  • 1 egg
  • 3/4 tablespoons of gram or gluten free flour
  • 1 heaped teaspoon of ground coriander
  • 1 heaped teaspoon of ground cumin
  • a handful of mint
  • salt
  • oil for frying

Method:

First soften the onions and garlic, I do this in a microwave because I find it easy but gently frying in a pan has the same results, you just want them soft and translucent.

Then add all the ingredients bar the flour to a food processor.  Blitz, you may need to scrape down any stray chickpeas or you might want to keep it chunky.  Then depending on the wetness of the mixture I add two to three tablespoons of flour, now my plan was to have chickpea flour (gram/besan) but  mine was out of date so I substituted gf plain flour, if you’re not coeliac then plain regular flour would work too.   You want a thick but not too wet mixture that you can easily manipulate, see picture for clarity there, it’s awful hard to describe!

Once you’ve got the right consistency, scoop out walnut size blobs if you want to emulate mine, but frankly any old size will work, you could make big fat burgers or round footballs or cut them into star shapes should you desire but flat patties was what I was after.

Then chill the patties for a while (time constraints permitting, I’m sure they would be fine fried straight away should you need to).

Shallow fry for about 3/4 minutes each side on a medium heat.  Then serve hot stuffed into a pitta with chilli sauce and yoghurt.

falafel stages

You can freeze these and heat up in the oven at a later date should you need to, I made too many for me and my little dinner guest so I’ve stashed the remainder away for a mid-week dinner.

Ok, so that was the first recipe for a while.  It felt good, what do you think?


Oven Baked Chilli Fries

This is a quick and simple recipe I knocked up for lunch, the chilli powder actually combines chilli (duh), cumin, oregano and garlic and gives these fries a spicy, moreish flavour which makes them almost impossible to resist, I thought I was knocking up enough for two but ended up eating  the lot.

Ingredients:

  • However many potatoes you want
  • Chilli powder, I went for a mild one but a hot one would certainly pack a punch
  • Olive oil
  • Salt

Method:

Pre heat your oven to 200 and get out a big tray.  Slice your potatoes (skin on) in to fat match sticks, well you could do wedges, super fine fries or whatever but i think fat match sticks worked well for a good crisp chip.  Chuck the tatties in large roasting tray then slug on a tablespoon or so of oil, mix with your hands then sprinkle liberally with chilli powder and salt then mix some more.

Shove in the oven for about 25 min until hot and crispy then serve with sour cream and sweet chilli.  Oh yeah.


Isabel’s Pizza Dough Mix – Review

I’ve been meaning to write a short post about this wonder mix for some time.  This stuff is pretty much the closest I’ve got to a ‘normal’ pizzeria style base.  Not only that but it also doubles as a pretty awesome flat bread come garlic bread for chowing down with everything from curries to salads or just as a ‘I need carbs, craving doughy things’ snack (you know what I mean right?!).

So below is my gorgeous gluten free pizza with a tomato sauce, mozzarella and chorizo topping.

And just under here is my mouthwatering, lipsmacking, slightly chewy, slightly crispy, buttery garlic flat bread served here with a lentil and aubergine curry and trust me this is going to be appearing more than weekly on my plate from now on.   Once you’ve made the dough you can roll these out and freeze them ready to whack in the oven any time the craving takes you, I stick mine in the ice cube tray to keep them flat.

The mix is made from cassava starch, milk powder, salt and ‘natural flavours’ (whatever that means) and I buy mine from Ocado but if you look at their lovely website you can order online or find alternative stockists.

Quick Chickpea Curry

I’ve got 2 Cadbury’s Creme Eggs and a packet of Minstrels in the fridge and I’m feeling guilty so thought I’d knock up a healthy veggie curry for lunch that could double up as one of my weekday packed lunches leaving enough sauce to spare to make something quick and spicy for tea in the week – multi tasking food, you see that?  What more do you want? Anyway by my wonderful diet logic if I eat one healthy meal that means I can deffo have eaten at least one of those creme eggs by the end of the day, it’s a simple balanced equation right?

This curry is quick and simple to knock up and is pretty much made with store cupboard ingredients, in fact if you don’t have chickpeas, a tin of beans, some lentils or whatever veggies you have lurking about in your fridge would all make welcome additions to this spicy sauce.

So here we go…

Serves 2 with left over sauce for another meal in the week

Ingredients:

  • 2 onions, finely chopped
  • 1 tin of chopped tomatoes
  • 2 heaped teaspoons of medium curry powder
  • 1 heaped teaspoon of garam masala
  • 3 fat cloves of garlic, finely chopped
  • a thumb sized piece of ginger, finely chopped
  • A dessert spoonful of mango chutney
  • 1 tin of coconut milk (I used half fat – cus this is like diet food innit)
  • 1 tin of chickpeas

Method:

Soften the onions in a pot with a tablespoon of oil until translucent, add the ginger and garlic and fry for a minute or two.  Add the spices and let them fry for a further minute then add the tomatoes and let it bubble down for about 5 minutes, stirring now and then to prevent it from catching.  Add the chutney, salt and  coconut milk, then blitz with a hand blender (or in a machine), return to the heat and bring to the simmer.  This is where you can now syphon off half the sauce and stash in the fridge or freezer until a later date. Now add the drained and rinsed chick peas to the pot.  Simmer the chickpeas for a further couple of minutes until everything is heated through then serve.  I served mine with a gluten free pitta for lunch and I’ll be having the other portion for lunch on Monday with a bit of tonight’s left over roast chicken dinner stirred in, I love a bit of leftovers don’t you?

Chilli with Gluten Free Corn Tortillas

I’ve been dreaming about gluten-free tortillas or wraps since I stopped eating gluten, they are somewhat the holy grail of gluten-free finds and until recently I didn’t think anyone manufactured any good ones.  However, it seems there is a saviour, Saara at The Gluten Free Student Cookbook has found some at the Mex Grocer and she also had a go at making some here.  These looked great and I shall be certainly ordering some of the Mex Grocer ones for my freezer but after reading Thomasina Miers’ Mexican Food Made Simple over the last week I had ambitions to go authentic and cook some from scratch.  Now you’ll need to source some ‘Masa Harina’ flour first, not too difficult it would seem, it’s of course readily available online but also stocked at major supermarkets (I found mine in Sainsburys).  It’s a pretty simple recipe, I followed the one on the back of the packet which just involves adding hot water, Thomasina adds some oil to hers  and in hindsight I would recommend a glug into the mix to improve the flexibility of the finished tortilla.  The ones I made were not something you could easily use for a fajita or wrap but made a great flat bread type accompaniment to a chilli and certainly would work well in wedges, refried and served with guacamole, salsa, sour cream and cheese.

The chilli was mostly my own invention, whilst I nicked the idea for  the admission of chorizo from Thomasina the rest was a bit of this and bit of that from my imagination (oh yeah and a quick consultary call to my Dad).

Ingredients:

For the chilli:

  • 250g of lean beef mince
  • 250g of pork mince
  • a third of a ring of chorizo, chopped into small chunks
  • 2 medium onions, finely chopped
  • 1 stick of celery, finely chopped
  • 1 tin of chopped tomatoes
  • 200g carton of passata
  • 1 tin of kidney beans
  • 1 heaped teaspoon of mild chilli powder (crank up the heat on this if you can take it, I regretted the lack of spice but I was catering for a 3 year old too so added extra fresh chilli to mine at the end)
  • 1 rounded teaspoon of sweet smoked paprika
  • 1 tablespoon of sherry vinegar
  • 2 tablespoons of ketchup
  • 1/2 a tablespoon of agave syrup
  • 2 cloves of garlic, finely chopped
  • 2/3 squares of dark chocolate
  • salt and pepper

For the tortillas (makes about 4, double, or triple for more):

  • 125g Masa Harina flour
  • 160ml of hot water
  • salt and pepper
  • a tablespoon of oil

Method:

Brown the mince and chorizo in a large pot.  Add the onion, celery and garlic and fry gently for a few minutes until tender.  Add the chilli powder and paprika and fry for a minute or so then add the tomatoes and passata and top with half a can of water.  Bring up to the simmer and add the vinegar, ketchup, syrup and salt and pepper.  Simmer with the lid on for about 30 min then add the kidney beans and cook on a low heat for a further 15 min.  Chuck in the chocolate, stir, then set aside until your tortillas are ready.

Mix the corn flour, salt, pepper, oil and hand hot water in a large bowl and bring together into a soft, clay like ball.  Cover and leave to rest for 15-30 min.  Take a golf ball sized chunk and roll in to a ball in your hands then place between the layers of a plastic sandwich bag.  Now this is where in an ideal world you would be a good Mexican cook and have a tortilla press to make fine looking circles with no cracks, however I’m not Mexican and I’m not very good either so instead I used a good old fashioned British rolling pin and made round (ish), cracked rustic circles, and when I say circles you can use your imagination there as well.  You want to aim for about 2mm thick but I say experimentation is the best way forward and find your way through trial and error, the odd snack or test case whilst cooking never did anyone any harm.  Heat a dry pan and cook your tortillas on a high heat for a couple of minutes each side until slightly puffed and charred. Keep your tortillas warm in a tea towel in a low oven whilst you assemble the rest of the meal.

I served my chilli in a bowl topped with a rough guacamole (chopped avocado, chilli and lime), sour cream, and grated cheese with the tortillas on the side to dip, wrap, mop up and devour.

Two Sausage Stew

This was a quick casserole type dish I knocked up in the week and have had subsequently for lunch and tonight’s dinner, it’s pretty straightforward to make and consists of mainly storecupboard and standard fridge contents.  The chorizo permeates through the whole dish and makes this a very moreish bowl of supper.

Serves 4

Ingredients:

  • 6 gluten free sausages (I used those ones by that Irish guy Rankin but throw in your favourites), each chopped into six bitesize pieces
  • About quarter of a ring of chorizo, chopped into small chunks
  • 2/3 large handfuls of green lentils (I didn’t measure so think about the amount of people you are trying to feed and wing it)
  • 2 onions, chopped
  • 1 large carrot, quartered lengthways and chopped into fine chunks
  • 1 stick of celery, split and chopped
  • 1 tin of chopped tomatoes
  • 1 clove of garlic, chopped
  • A glass of red wine
  • A big squirt of ketchup
  • lots of fresh ground pepper

Method:

Fry off the sausages and chorizo in the bottom of a heavy pot until browned.  Soften the onions, celery and carrots in a bowl in the microwave then add with the garlic to the pot.  Fry for a minute or so then splosh in the red wine, let it reduce for a moment or so then add the tomatoes, ketchup and pepper.  Wash and then add the lentils and top up with about half to a can full of water.  Top with a lid and simmer for about 25 min or until lentils are tender.  Adjust the seasoning if necessary, I didn’t need to add any salt to this because the chorizo and sausages seemed to salt it enough so give it a taste and see.  Serve alone in a bowl or with crusty bread.

Butternut Squash Bake

This is basically a bastardisation of the creamy, thigh fatteningly good Dauphinois Potatoes except in a very generous attempt to create a slimmer version I’ve replaced the tatties with squash and probably cheapened it a little by using some bog standard cheddar on the top.  Anyways this is super simple and has become a weekly staple at Flood towers.  I eat it on its own or with some wilted spinach although it would make a smashing side to a roast if you can be bothered.

Butternut Squash Bake

Ingredients:

  • 1 butternut squash
  • 1 tub of double cream (erm about 200ml or whatever the medium size tub holds or your dish can take?)
  • 1 fat clove of garlic
  • A big handful of cheddar or whatever cheese you fancy

Method:

Pre heat the oven to 180 degrees.  Peel the squash and slice into thin slices, as thin as you can get basically, if you;ve got a mandolin then go you but I did pretty well with a cleaver and some concentrated slicing.  Peel and half a garlic clove then rub the garlic round the dish you are using, I used a glass casserole dish but a deepish baking tray would do.  Chop the remaining garlic and set aside for a mo.

And so begins the layering, spread out even layers of squash then a sprinkle of garlic, then squash until you get near the top, that’s when I start to care about the layout and fan them nicely across the top (although it doesn’t really matter as you’ll see from the appalling photograph, as it gets covered in molten cheese and cream by the end).  Then pour over the cream letting it drip down to the bottom, don’t worry about filling it right to the brim, it seems to work just fine without cream overload.  Sprinkle the top with cheese, oh go on then a little more, then slide into the oven and bake for about 40-45 minutes until the squash is tender and the top is molten and bubbling, golden and cheesy goodness.

I told you about the photo didn't I?

Serve as suggested before with wilted spinach, or a salad or let this accompany your Sunday roast.

Spiced Squash and Satay Noodles

It’s Autumn, we are approaching Halloween, it’s time, isn’t it? Cue the squash recipe…

Serves 2

Ingredients:

  • Half a large butternut squash, peeled and chopped into 1 and 1/2 cm dice
  • 1/2 teaspoon each of ground coriander and ground cumin
  • oil
  • half an onion
  • 2 inches of ginger
  • 2 fat cloves of garlic
  • 1/2 a can of coconut milk
  • A heaped tablespoon of crunchy peanut butter
  • A tablespoon and a half of sweet chilli sauce
  • Soy sauce
  • Juice from half a lime
  • Salt and pepper
  • Flat rice noodles
  • A handful of spinach

Method:

Pre-heat the oven to about 220 degrees.  Chuck the chopped squash into a baking tray lightly coat in oil and sprinkle with the cumin and coriander, toss to coat then shove in the oven for about 15 min until slightly charred and tender.

Blitz the onion, ginger and garlic in a mini food processor ( or finely chop) then soften in the microwave (in a covered bowl) for a couple of minutes, alternative fry on low until soft and translucent.  Transfer onion mix to small sauce pan and begin to fry (add fresh chilli here if you like it hot), add curry powder, fry off for a min then add peanut butter, coconut milk, sweet chilli and stir until combined.  Add soy and lime, bring to the bubble, taste and adjust ingredients to suit.  Set aside whilst you prep the noodles.

Soak your rice noodles in boiled water until tender (I usually keep changing the water, about 3 times, in between 2 min soaks so that I’m not hanging around too long and the noodles stay hot as well as soft.  Once the noodles are ready, drain and toss with the spinach.  Boil up sauce and add half to the mix, stir together, mix in half the roasted squash and plate up.  Top with the remaining and most beautifully charred squash, maybe a few crushed peanuts and some chopped coriander (miss out the last 2 steps if you are like me and can’t be arsed with faffing around when you are hungry).

Tip:  If you don’t have a use for the remaining half a tin of coconut milk, half an onion (aka the awkward leftovers) double up the sauce recipe and freeze some for the next time you feel satay inclined, I’m not actually sure why I didn’t do this, oops…

Aubergine Curry with Gram Flour Flat Breads

I was pretty surprised at just how delicious this curry was.  I cooked it without any oil, just a little of that spray light and it worked really well, it also means it’s practically fat free and good for the diet (zzzzzz).  I think the secret is the grilling of the whole aubergine until charred and smoky and then using the scooped out flesh.  I’ve made the flat breads before, they are kind of a mix between socca and dosas in that they utilise the basic concept of the socca recipe, gram flour, water and seasoning, yet I make them like a dosa style pancake.

Aubergine Curry with Gram Flour Flat Breads and Cottage Cheese (yeah that's right, COTTAGE CHEESE!)

Oh yeah and I served it up with some cottage cheese, now I know I’m going to sound a little like a diet obsessed freak here but it worked really well, almost like a creamier yoghurt type substitute with a bit more body and the cool, soft cheese provided the perfect partner to this spiced aubergine and made a change from the more traditional yoghurt.  In fact I read somewhere someone talking about how cottage cheese was pretty much the same as ricotta and although sadly underrated made a much cheaper alternative.  Right enough said, it’s alright you know!

Serves 1 or 2 as a side dish

Ingredients:

  • 1 aubergine
  • 1 smallish onion
  • 2 tomatoes, skinned and de-seeded
  • 2 fat cloves of garlic
  • an inch of ginger
  • 1 heaped teaspoon of mild curry powder
  • salt
  • Spray light (or if you are not watching your waistline they go ahead pour a load of yummy oil in the pan *evil eyes*)

Method:

Turn your grill on.  Whack your aubergine under the grill and turn every few minutes until it is charred and saggy.  Set aside.

Slice your onion and soften in the microwave with a splash of water, ie put in bowl, splash with water and cover with a plate, I normally put it in on high for about 3 minutes.

Finely chop your garlic and ginger with some salt.  Heat a small frying pan and spray with oil.  Add your softened onions and ginger and garlic and fry until slightly browned.  Add the curry powder and fry for 30 seconds.  Add the roughly chopped tomatoes and fry for another min.  Scoop out the innards of the aubergine and add to the pan.  Stir and season to taste.

Serve with the flat breads, see recipe here, some cottage cheese and maybe a bit of mango chutney.  I serve it all separately but it would make a great wrap if you were wanting a fajita vibe.

Duck Breasts with Orange and Ginger Carrots

I’m typing in pain, during the making of this delicious dish I was a complete eejit and managed to burn myself with boiling hot duck fat.  Lets just say when draining hot fat out of a pan do not attempt to hold the dish you are pouring into in your hand, particularly if it is glass, as said glass dish could break in your hands sending boiling hot fat everywhere.  Lesson learnt. Hand burnt.

I bought duck breasts because I saw them reduced in the local supermarket and thought I might be able to knock up something oriental inspired to make up for the lack of Chinese takeaway deliveries to this flat lately.  My finger is still burning and typing seems to be aggravating this so I keep it short.

Serves 2

Ingredients:

  • 2 carrots, sliced into fine julienne
  • 3 spring onions, sliced
  • 1 inch of ginger, chopped
  • 1 fat clove of garlic, chopped
  • zest of 1 orange
  • juice of orange
  • good slosh or two of soy sauce ( I used Tamari, gf)
  • 2 dessert spoonfuls of agave syrup, or sugar
  • 2 duck breasts

Method:

Prepare all your veg and set to one side.  Score the duck skin in a criss cross pattern, and salt.  Heat a frying pan.  Place duck breasts skin side down in hot, dry pan.  Fry for about 5 min on skin side and 3 on other side, depending on size, this should ensure a crispy skin and a pink middle.

Take the breasts out of the pan and rest on a board.  Drain off fat bar about a teaspoonful (you can use this for frying potatoes in at another time).  See cautionary tale above for tips on how to be a complete butter fingers and burn yourself.  Add ginger and garlic to the pan, stir fry for a minute.  Add the carrots, spring onions, soy, orange juice and zest.  Stir fry for a couple of minutes.  Add syrup or sugar and stir letting it bubble up into a sticky coating.  Pile a heap of carrots onto each plate, slice duck diagonally and place on top.  Serve.